Making BurnInTest Self Bootable with PassMark WinPE Builder
A bootable USB Flash Drive can be setup with Windows 10/11 and BurnInTest Windows using Microsoft WinPE. Many BurnInTest users can benefit from testing PC hardware when there is no Operating system installed, or the Operating System is inoperable. This can be useful for testing PC hardware:
- In a production line environment,
- That is to be shipped with Linux,
- In a known virus free environment and
- To try to determine the cause of corruption of an Operating System.
A document has been produced to assist in setting up an environment that allows PassMark BurnInTest to be used in these situations.
This web page describes the use of the PassMark WinPE Builder tool to build a self booting USB Flash Drive. To just setup BurnInTest on a USB Flash drive when an operating system is already installed on the test system (i.e. not self booting), please see here.
Before we begin:
Windows Preinstallation Environment (PE) is a lightweight version of Windows built on the Windows Kernel. Windows PE is not designed to be the primary operating system on a computer; however, it can be useful for quick testing a computer that does not have an OS installed. This tutorial will walk through the process of creating a BurnInTest Bootable solution on an USB Flash Drive using PassMark WinPE Builder. While previous versions of WinPE may work, we reccommend using WinPE for Windows 10 for best support/compatibility.
- Download and install WinPE from Microsoft. Make note of the installation directory.
- Download PassMark WinPE Builder.
- A copy of BurnInTest for Windows installed on your computer and your license key email.
- A USB Flash Drive (UFD). Back up any important data on the UFD, drive will be formatted during the build process.
For the most part, all the options in PassMark WinPE Builder will be set to the default. Besides injecting the USB 2.0 & 3.0 Loopback Plug drivers (optional), you should not need to adjust the settings unless you want to customize your WinPE build further or to include additional tools. This is not supported by PassMark or shown in this tutorial.
Video Tutorial
This video will walk you the use of WinPE Builder in creating a self-booting PC Test solution.
Specifying the WinPE build environment
Our base Windows PE image will be based on 64-bit WinPE for Windows 10 environment. (Note: 32-bit version of BurnInTest will not run in a 64-bit WinPE environment. You will need to 64-bit version of BurnInTest in this scenario.) WinPE for Windows 10 is selected because of its native support for USB 3.0. We will leave the Additional Packages on their default selection. Only WinPE-HTA, WinPE-Scripting, WinPE-WMI, and WinPE-StorageWMI are needed.
In the "Windows AIK or ADK installed directory:" location box. Enter in where you have installed the kit. The default location is pre-entered, if you have chosen to change the install directory. You will need to point to the location where you have it.

Adding BurnInTest to the WinPE Image
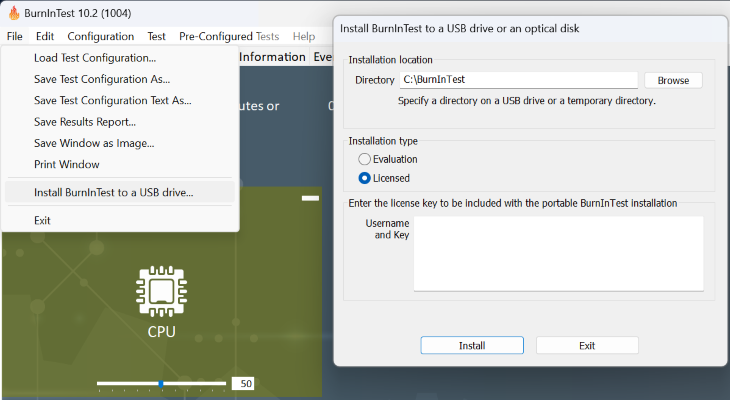
In BurnInTest, choose "File->Install BurnInTest to USB Drive..." menu option. The Install to USB function will place all the necessary files to run a standalone version of BurnInTest without having the software installed on the system beforehand. Specify a location where you wish to place the files temporarily. Make note of the location, as it will be used in the next step. For "Installation Type", select licensed and enter in your license key. When ready, click install. (Note: 32-bit version of BurnInTest will not run in a 64-bit WinPE environment, you will need to 64-bit version of BurnInTest in this scenario.)
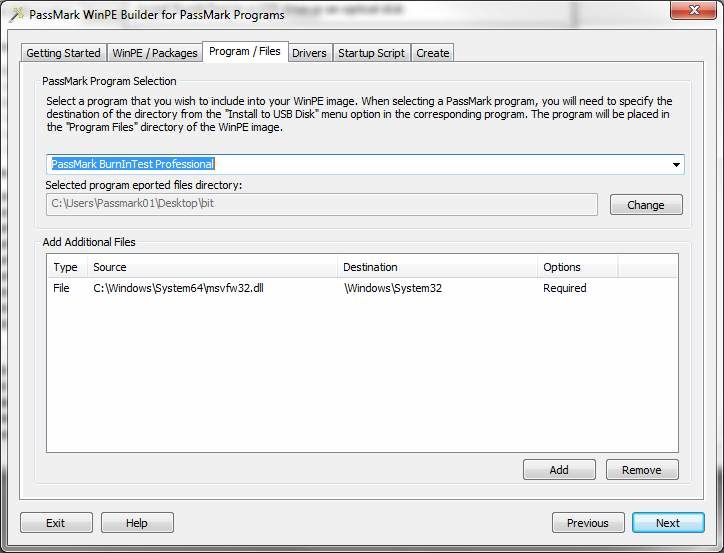
In WinPE Builder, select PassMark BurnInTest in the drop down box and navigate to the folder in the previous step where you saved the BurnInTest files. The "Add Additional Files" will automatically populate with msvfw32.dll file that is needed for BurnInTest to work. If you would like to place any additional files into the image, such as devcon utility for parallel port support, you can do so with "Add" button.
Adding Drivers
If you would like to test USB 2.0 and/or USB 3.0 Loopback Plugs, you will need to include the drivers into the WinPE image. Download the packaged drivers files from PassMark website and unzip them to your computer. Select the Add button to navigate to the location where you uncompressed the driver files. During the build process, the folders with be recursively searched for any valid .inf driver files.
Additionally, if any NIC and Mass Storage (RAID) drivers are needed for your target system, you can include them here. In many cases this is not required. You will need to add and specify the folder the drivers (.inf) files are in.

Startup Script
The startup script is used to tell WinPE to launch BurnInTest after booting. There are two default script provided. The first uses "startnet.cmd" method which will give you access to the command prompt to run additional commands, batch files or scripts. The alternative method is "winpeshl.ini" which will not provide access to the command prompt. We will select startnet.cmd and use the default script generated. You can alter the script further to customize your needs. In this tutorial we will leave it at default.
If BurnInTest should format the hard disk of the system under test before starting, you will need to uncomment the line ("diskpart /s diskpart.txt") regarding diskpart and provide a diskpart script file. Warning! Diskpart.exe is only required if your disk is unformatted. This will delete any data on physical drive. If your hard disk is formatted, do not uncomment the disk partitioning tool line - it is optional.
If you are testing a parallel port, you will need to uncomment the lines in the script enabling it.

Create the Image
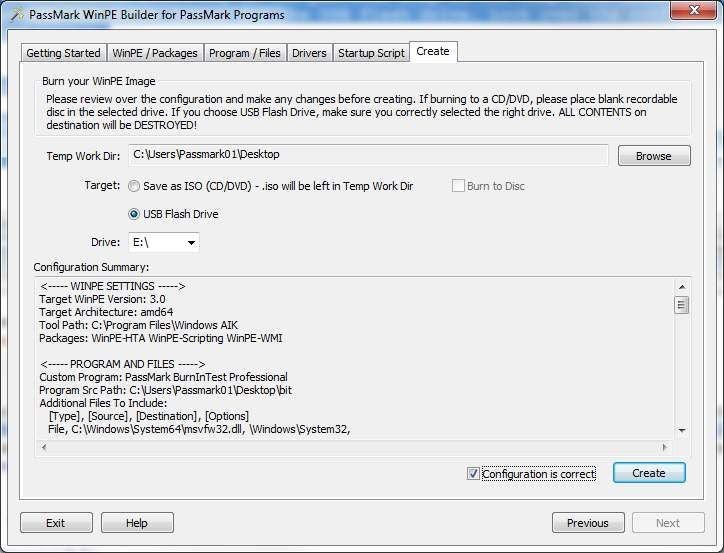
The default "Temp Work Dir" will be the directory you launched the WinPE Builder program from. If for some reason, this is not an appropriate location, you can specify another directory. The location should have around 1GB of free space. (Note: DO NOT use the BurnInTest directory in the previous step as the temp work directory.)
Select "USB Flash Drive" as the target and specify the drive letter for the USB flash drive. Look over the configuration summary to verify the settings are correct. When satisfied, check the "Configuration is correct" checkbox to enable the "Create" button.
Sit back and wait...
A progress screen should appear and the build process will be underway. Once complete, the USB Flash Drive can be used to boot a system into BurnInTest.

Head back to the BurnInTest FAQ page.