BurnInTest Windows - FAQ
We have compiled answers to commonly asked questions in our BurnInTest FAQ below. You can also discuss any questions or suggestions you may have at our BurnInTest Discussion and Support forums, as well as read solutions for issues that have been previously answered.
If you need further assistance, please feel free to contact us by e-mail at help@passmark.com
License Key Questions
How does the new licensing in BurnInTest V11 work?
As of V11, BurnInTest running on a Single User License needs an internet connection to fuction. The license isn't locked to any given machine: it is a floating license. See this detailed outline on BurnInTest Licensing for further information
Why isn't my License Key working?
License Key must be correctly entered before the software turns itself into the registered version. See this step-by-step guide for help.
- Keys will work only work for the version issued for (e.g., a BurnInTest V10 key will only work for BurnInTest V10)
- Keys for BurnInTest Linux will not work in BurnInTest Windows.
How many licenses will I need if I purchase BurnInTest?
Once purchased, a license is perpetual and does not require renewal. The initial purchase also includes 12 months of support and software updates, which can be extended annually if required. You need 1 license per machine that is running the software, or has the software installed at the same time.
- Example 1: You have a PC production line that produces 10 machines per day. You test each machine during the night. A maximum of 10 machines are running the software at any one time, and you re-image the machine before shipping. 10 Licenses are required.
- Example 2: You are a company that takes delivery of no more than two new machines at a time. You want to burn in both machines at the same time. 2 licenses are required, assuming you uninstall the software before putting the machine into service.
- Example 3: You have 5 staff in the field repairing PC's. Each technician carries a copy of BurnInTest with them on a USB drive. 5 licenses are required assuming the software is always run from the USB drive.
Unlimited usage: Site licenses are available for coverage for an unlimited number of users within a single organization within a single country.
I have lost my License Key; how can I get it back?
Login to your PassMark Account to access a copy of your BurnInTest License Key.
I have a license start-up error, what does it mean?
"Startup Error Number 1"
BurnInTest cannot find the license information. When running from a CD, USB drive, BartPE or WinPE, you need a file called key.dat in the BurnInTest directory with your license key in it (or the evaluation equivalent). You should create your BurnInTest directory using, File -> Install BurnInTest to a USB drive, as this process creates the necessary files for the CD, USB drive, BartPE plugin directory or WinPE Program Files directory. The key.dat file must not have blank lines contained in it. See help topics: Test automation and productivity, Installing BurnInTest to a USB drive.
"Startup Error Number 7"
The license key is for other PassMark software, but not for the version of BurnInTest you are trying to use.
What is the difference between the trial version and the paid software?
There is no limit in the testing capabilities of the software, the only restriction is the length of time you can run tests. With the trial version of BurnInTest, you are limited to running tests for 15 minutes at a time.
Install and Uninstall
How do I install the software? I need some help to "Unzip" the file I have just downloaded.
Most of our software is now distributed in self extracting archives ('.exe' files) so you do not need to 'unzip'. However, some download sites prefer the Zip version. If you need help to unzip a file, see our Unzipping page.
I do not need to do any more tests; how do I uninstall BurnInTest?
Use the "Add / remove programs" icon in the Windows control panel.
Does BurnInTest support the use of older BurnInTest configuration files?
Yes. BurnInTest will read config files from the earliest builds of BurnInTest V10 and convert these to latest configuration file version.
General Usage
The test run stops after 15 minutes, why?
With the trial version the tests will only run for 15 minutes at a time. After the software has been purchased, the time is unlimited. Note that you can still get a much longer test run in the trial version by clicking on the Go button each 15 minutes After the software has been purchased the test duration can be increased from the, 'Auto Stop' field in the 'Test preferences' window.
How does BurnInTest work? Doesn't it just wear my computer out?
Societies' reliance on computers means that the cost of hardware failure can be enormous (and embarrassing). BurnInTest thoroughly exercises PC hardware in the shortest amount of time so intermittent or hidden problems are found before they turn into a disaster. The typical life span of the main moving component in a PC, the hard drive, is quoted at around 300,000 hours by manufacturers such as Seagate. The use of BurnInTest for a 6-to-12-hour period would thus have a no significant impact on the life of the drive. On the other hand, it would allow manufacturing faults and intermittent faults to be detected in a controlled manner when the consequences of failure are minimal. The situation is the same for more modern SSDs, a test lasting several hours will still only be a tiny percentage of expected lifespan for the hardware.
How long should I run BurnInTest for?
In our opinion, the chances of finding a problem in the first hour are relatively high, (the system gets hot, it is the first run across the disk / CD and the first use of some of the drivers). Then every hour after that, the chance of finding a hardware problem drops significantly. The extra benefit of doing 12 hours compared to 6 hours is thus probably not great. For a small fast SSD, this might be just 1 hour, but for slower large drives this might be 24 hours. Other nice technique is temperature cycling. All major manufacturers of electronic equipment do this, they have large ovens and fridges in which they test equipment. The expansion and contraction of components and solder joins brings to light many problems. You could do 6 hours on, 6 hours off, then 6 hours on, to get some limited temperature variation like this. NASA and the Army load their equipment on to vibration machines, but this may be going too far for home / office use.
What duty cycle setting should I use?
See the page BurnInTest - What duty cycle setting should I use?
BurnInTest fails to start or crashes on start, what can I do to debug this?
See the page BurnInTest for Windows - Startup Debugging
About systems with low amounts of RAM
See the page BurnInTest - About systems with only 4GB RAM
Test Setup and Information
What is the maximum number of CPU cores that BurnInTest can test?
BurnInTest can test up to 1024 cores in up to 32 sockets (within the limits of what the operating system permits).
How can I test my Trusted Protection Module (TPM)
See the page BurnInTest - Testing a TPM
How can I use BurnInTest to test for counterfeit oversize capacity USB drives?
See the page BurnInTest FAQ - Testing for fake counterfeit USB drive capacity
BurnInTest does not have a test for my specialized hardware. Can I add my own test to be run with the other tests?
Yes. If you have specialized hardware that BurnInTest does not test, you can write your own test and integrate it with BurnInTest. Up to 5 plugins can be specified. PassMark has developed plugins for the following tests:
Sample software in C and C++ is also available to assist developing a plugin for your specific hardware.
Can I setup BurnInTest to self-boot (e.g., from a USB drive) to test my system without an operating system?
See the page BurnInTest FAQ - Making BurnInTest Self Bootable with PassMark WinPE Builder
Can I setup BurnInTest to boot from a PXE Server?
See the page BurnInTest FAQ - How do I setup BurnInTest to boot from a PXE server?
How can I get BurnInTest to detect mapped network drives?
Due to the way UAC works in Windows, often when a network drive is mapped to a specific user a program running with elevated Administrator rights (as BurnInTest does) will not be able to see it. To solve this, you can edit the registry to enable it by adding a EnableLinkedConnections value:
- Click Start, type regedit in the Start programs and files box, and then press ENTER.
- Locate and then right-click the registry subkey HKEY_LOCAL_MACHINE\SOFTWARE\Microsoft\Windows\CurrentVersion\Policies\System.
- Point to New, and then click DWORD Value.
- Type EnableLinkedConnections, and then press ENTER.
- Right-click EnableLinkedConnections, and then click Modify.
- In the Value data box, type 1, and then click OK.
- Exit Registry Editor, and then restart the computer.
Which network test should I use, standard or advanced?
There are two network tests in BurnInTest, a standard and an advanced one.
- Use the standard network test for quick and simple testing of the network cards and where more than one system under test exists on the same network.
- Use the advanced network test for more in depth, full duplex load testing and where only one system under test will exist on the network.
The standard test is a ICMP_ECHO (ping) test, it requires a destination IP address to be entered and the network card will ping this destination IP and report on the number of errors (packets that are never acknowledged as received). This is a simple test designed to ensure the network card has an IP and can't communicate with other network equipment. Be aware that ping packets can be dropped by network hardware if load levels are too high or the network hardware has security settings setting disabling ping responses.
The advanced test requires one or more systems on the network to be running the Endpoint application (packaged with the BurninTest installer) and is designed for stability and load testing, it is a peer to peer TCP/IP test that opens a network connection between the NICs on the test system and one of the detected Endpoint systems. Test settings allow the test to be run as half or full duplex, allow validation of data sent and received and target a specific network load percentage. BurnInTest will attempt to maintain the target speed load of the network card by inserting sleep periods into the send and receive threads, this is not the exact speed the test will run at but a rough average of the speed BurnInTest will attempt to maintain. Only one instance of the BurnInTest can be running the advanced network test on the same network.
Can I test two network cards on the same system connected to each other?
BurnInTest FAQ - Test network cards on the same system using crossover
Two network cards on the same system connected directly with a network cable can be tested by the standard network test however care must be taken when setting the test up to have it work as expected.
First connect the two network cards directly with a network cable and assign each network card a static IP, e.g., 192.168.0.1 and 192.168.0.2.
Next open the network test settings, BurnInTest users the entered IP addresses and assigns them to a network card based on the order as seen by the operating system, they cannot be assumed to be in name or IP order.
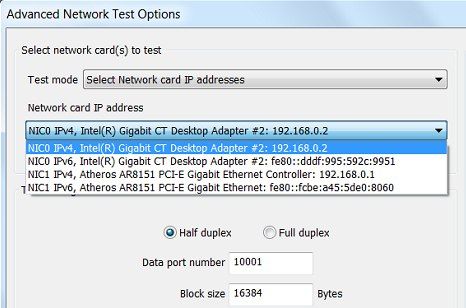
To check what order BurnInTest see the cards in select the Advanced network test option and then click the Advanced test options button. This will display the list of available network cards, see the picture below for an example and note that network card with the 192.168.0.2 IP is the first in the list.
Close this window and reselect the standard network test option.
Select the "All available physical ethernet ports" option and for the first address to be tested enter the IP address that was not the first entry shown by the advanced network test, in this case 192.168.0.1.
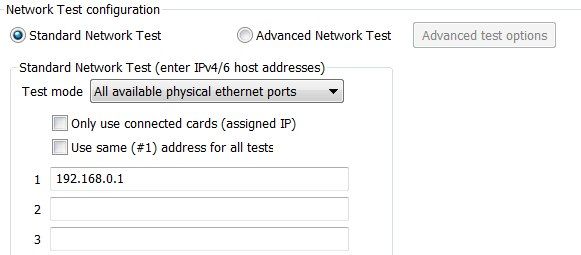
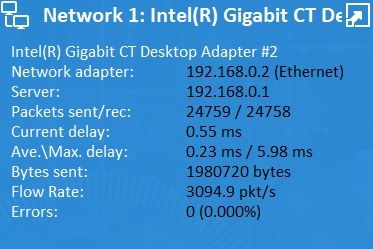
Now when the test runs it will find the first network card, 192.168.0.2, and start testing to the address 192.168.0.1, as seen in the example below.
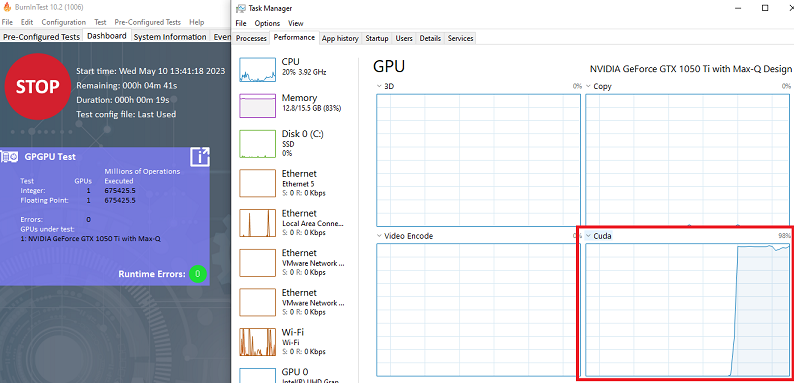
GPU Compute Utilization in Task Manager
The GPU Utilization in Windows Task Manager may not show the correct GPGPU workload when running BurnInTest V10.2.1006 or later. Starting in V10.2.1006, when the GPGPU test is ran under OpenCL (instead of Direct Compute), you can view the workload by selecting the "CUDA" or "Compute #" graph.
Problems During Testing
My system crashed after X days of running BurnInTest but after a reboot was OK again?
Here are some general comments about occasional system crashes.
Common causes for a system crash are device driver and hardware problems. When a system crashes it will display a diagnostic screen (Blue Screen Of Death) or restart, depending on your systems configuration. If a BSOD is displayed it may display helpful information, such as the name of the device driver that crashed. If this is the case, then update that driver, or uninstall the related hardware/driver if possible. Otherwise, you can use this diagnostic information to search the Internet for possible solutions to your problem. If your system is configured to restart on a system failure (System->Advanced->Startup and recovery, Settings->System failure=automatically restart), then investigating a Kernel memory dump (e.g., \Windows\Minidump\*.dmp) can be helpful to identify the faulty component.
Excessive heat can cause a system to fail over time, so monitoring the temperature while stress testing the system can help identify this. The solution could be fixing/cleaning fans, re-applying the CPU thermal paste or adding more cooling.
Problems can occur if your computer runs out of system resources because there is some process or driver that does not release memory, handles, semaphores, etc. back to the operating system. After a long period of uptime Windows runs out of resources which can cause the operating system to crash. What can you do about this? Identify the offending software, if you can, and disable it. Keep in mind that this could be a bug in the operating system.
Many things can cause a computer to crash. Typical things would be a spike on the power line, a strong burst of electromagnetic interference (e.g. power fluctuations, electric motors, lightning, etc..). If your system is running at its limits due to overclocking or your components are running at the top of their temperature range, small external influences can push your system over the edge resulting in a crash. What can you do about this?
- Operate your machine and all its components within their specified tolerances.
- Buy an enterprise or industrial specification computer with higher tolerances.
- Run a hot standby system, that can take over the job of the main computer in a few seconds.
- Buy equipment with N+1 redundancy and switch traffic off the faulty hardware. Almost all Telecommunications hardware also has a built in auto-reboot function. Why? Because they know it will eventually fail.
Some software/hardware bugs only show up in very rare occasions. These can be caused by drivers, the operating system, your hardware, any part of your system. They are the most difficult to reproduce and therefore the most difficult to diagnose, for the you, the user, as well as for the maker of the machine or software. What can you do about these types of bugs? If a crash dump or any logs (be they Windows Event Logs or ones specific to the software running) have been generated it may be possible to deduce a cause or at least narrow down the list of possibilities.
Mundane program bugs are, of course, also a major cause of failure.
BurnInTest FAQ - PC fault finding tips
What follows are some hints on how to go about finding the cause of a system crash. We do not try to explain the steps listed. They are just a guide to some things that are worth investigating.
- Check you do not have any viruses.
- Check the hard drive for errors using the built in Windows error checker. (Right click on the drive letter in Windows explorer, select Properties then Tools / Error checking)
- Check that free space is available on the hard disk(s) for the windows swap file.
- Do not run all the BurnInTest tests at once when looking for a fault. Run just the 2D graphics, then run just the 3D graphics, then just the disk, etc. This will allow the problem to be isolated to one area.
- Faulty RAM can show up in many ways. e.g., Disk I/O error or a system crash.
- Boot Windows up in Safe Mode and see if the system is more stable.
- If you suspect faulty hardware to be the source of the problem, and you know what you are doing, pull out all the "optional hardware", e.g., LAN cards, I/O cards and see if the system is more stable.
- Once again, if you know what you are doing, start swap out components of the system to see if the fault can be localized. You will need some spare hardware to do this.
- Check that the power supply that you have is large enough to power all the components installed in your system. A power supply typically supplies power at several different voltages (e.g., 3.3V, 5V, 12V). Check that there is adequate wattage available at each of these voltages. PC power supplies are typically in the 300 - 800 Watt range. (Avoid power supplies that are 250 watts or less).
- Spikes in the main power supply can cause problems. If you suspect that you have dirty mains power consider getting a power conditioner, UPS, or surge protector.
- Check that internal cards and cables are not loose and do not have dirty contacts.
- Ensure that your computer is operating at a reasonable temperature. Check that fans are operating correctly, and heat sinks are making good contact.
- Make sure you have got the most up to date software drivers for your hardware. Drivers are a never-ending source of problems.
- Check that your BIOS settings are correct. Note down the original settings before you change anything. You might also want to check that you have the latest BIOS that is available from your motherboard manufacturer.
- Cheaply made components can also be a source of system crashes. Often it may not be the cheap hardware that causes problems but the quality and support of the software drivers that come with the hardware that are a problem. Do not shop on price alone, check out the support and product reviews.
- If your system crashes, then check (1) the Blue Screen Of Death diagnostic screen for pointers to the cause of the crash (e.g., a particular device driver), (2) \Windows\Minidump\*.dmp for a detailed crash dump to analyse.
- If you are really stuck, you may want to try a reinstallation of Windows on a reformatted disk. Think carefully about this option before you attempt it, there are lots of good reasons why you do not want to reformat your hard disk.
I get the warning "The 3D test was interrupted".
This warning can occur when:
- The screen saver starts during the test.
- A power saving option such as switching the display off or the PC going into a sleep state occurs.
- The screen resolution changes during the test.
- The screen mode is changed during the test, e.g., rotating a tablet.
- Another 3D application that uses DirectX was launched while the 3D test was running.
- The monitor is disconnected during the test.
- A KVM is used and switched to another system.
- The user presses Ctrl-Alt-Delete on the keyboard.
- The user runs an application with elevated administrator privileges.
- The video card device driver crashes and restarts. In this case you will often get a message in the Window's system tray, saying, "Display driver stopped responding and has recovered".
- Loading the system too heavily, particularly with other graphics related tests (e.g., GPGPU) and running the DX12 test. In this case the DX12 test can time out by taking too long to launch the test and the message "3D Graphics, timed out waiting for DirectX 12 test to complete" can appear in the trace log.
Things you can try to narrow down the issue:
- Decrease the duty cycle for other tests, particularly the GPGPU test.
- Check you are using the latest device driver for your video card.
- Check that the screen saver has been turned off.
- Do not press Ctrl-Alt-Delete on the keyboard during the test.
- Check that power saving options have been turned off including options like "Turn off display after X minutes".
- Do not run an application with elevated administrator privileges during the test
- Do not use a KVM switch.
- Check the windows event logs for any video device driver crashes around the time that the test was interrupted. From Windows Vista there is also a specific event when Windows restarts the device driver.
- Try running without the RAM test (low memory conditions can cause Windows to turn Aero theme off automatically).
- Change the Windows Aero theme to basic before starting the test
- We have had a report that testing on unactivated versions of Windows can lead to notifications that interrupt the 3D test. If you have this issue and have not activated Windows, and have tried all the above, then we suggest either activating Windows or disabling all pop-up notifications.
Graphics Device Driver Crash
Sometimes the graphics card device driver crashes. This results in a time out often followed by a recovery.
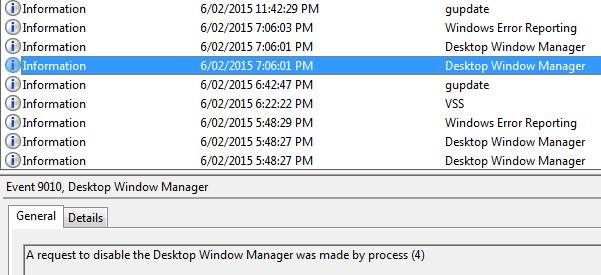
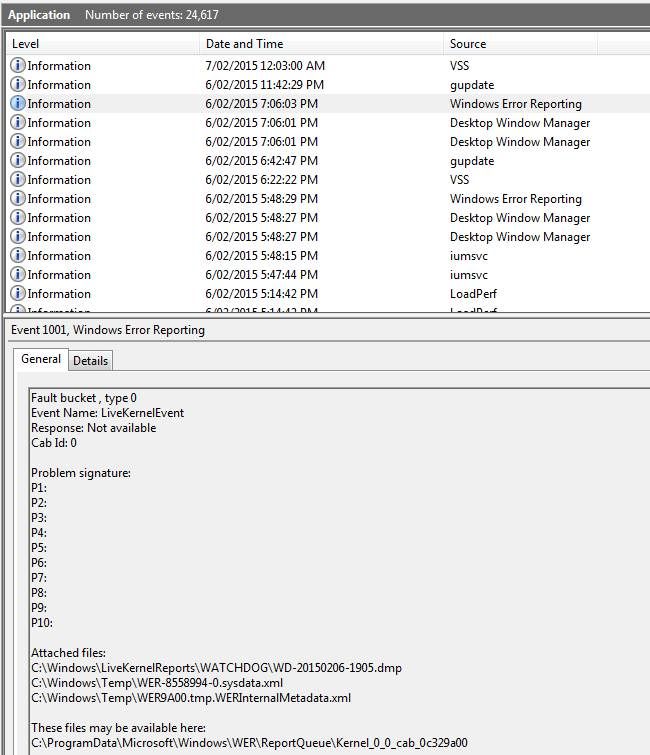
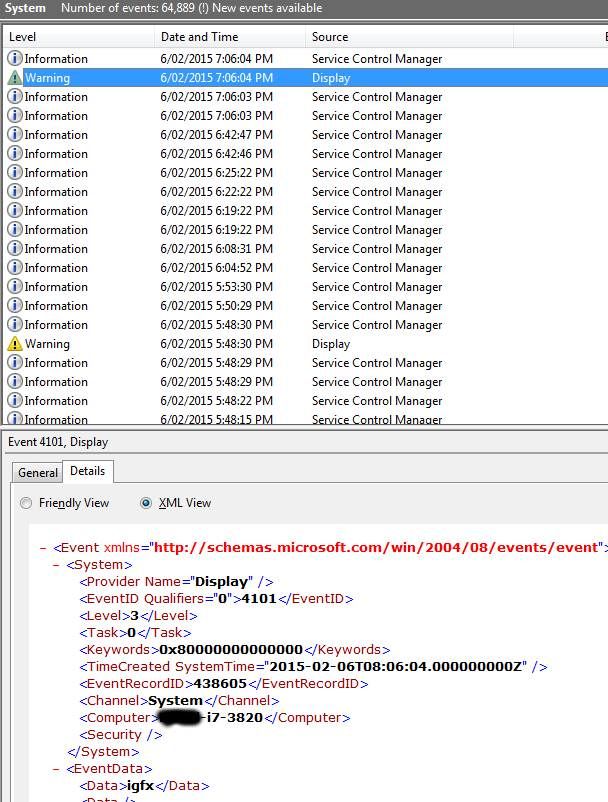
The System and Application event logs should be checked around the time of the event. To view the events, open Event Viewer, expand "Windows Logs" and select "Application", look for "Desktop Window Manager" and "Windows Error Reporting" events around the time the 3D test was interrupted. Then select "System" events and look for "Display" Warning events (e.g., Display driver igfx stopped responding and has been successfully recovered).
A graphics device driver
- The Application event log shows a "Desktop Windows Manager" “A request to disable the Desktop Window Manager was made by process (4)”, (i.e., by the Operating System).
- The Application event log shows a "Windows Error Reporting" event and the crash dump produced by Windows Error Reporting shows a timeout in igdkmd64.sys (VIDEO_TDR_TIMEOUT_DETECTED (117) - The display driver failed to respond in timely fashion.)
- The System event log showed a "Display" Warning event ("Display driver igfx stopped responding and has been successfully recovered").
These events caused the "3D test was interrupted" reported by the BurnInTest 3D test.
Event viewer screenshots for reference
1. Application event log
2. Application event log
3. System event log
BurnInTest crashes at the start of testing.
If BurnInTest creates a detailed (minidump) debug file, please email it to us, e.g., C:\Users\<username>\Documents\PassMark\BurnInTest\<Crash dump>.dmp
The most common reason for a fault like this is a problem with the low level communication BurnInTest does for temperatures and for certain RAM properties.
The way to access these properties changes over time and from system maker to system maker (AMD, Intel, ASUS, GigaByte, MSI, ASRock and all the Dells and HPs of the world).
Temperature monitoring of my USB drive only works sometimes.
We have found that some USB drives can hang (block) on requesting temperature (SMART) information repeatedly. We have observed this with the Seagate "Expansion External" USB drive. When this occurs, the BurnInTest temperature graph will show no results for the USB drive temperature from the point in time that this problem occurs. If you have this problem, it is suggested that you de-select temperature monitoring for this USB drive in BurnInTest Preferences->Temperature.
I get time-out errors during the serial port test.
If you are testing serial ports at a high speed, together with USB ports, it should be noted that some chip sets have been reported to have limitations while under load high load. Contact your manufacturer regarding these types of limitations.
I get an error with the parallel port test, "Error loading parallel port device driver".
This problem can occur when you are running BurnInTest from a networked drive. In this case Windows may fail to load the device driver required to provide access to the parallel port. The only solution, for the moment, is to copy the BurnInTest files to a local drive before running it.
Update 1: This has also been seen, even when BurnInTest is on a local drive. It seems to be a timing issue. BurnInTest will automatically attempt to reload the driver after a delay of a few seconds and the test will continue correctly thereafter.
For the parallel port test, the detailed log file indicates some errors, which are not, indicated in the main window of the BurnInTest. Why?
If a byte is read from the parallel port and it is determined to be wrong, then there is a 2nd attempt to read the same byte (at least 10ms after the 1st attempt). If the 2nd attempt gets the right value, then there is no error reported in the main window. If the 2nd attempt also gets a wrong value, then the error count in the main window is incremented. In the case of corrupted data being received during the parallel port test the following information is included in the log file.
Sent = the byte value sent to the parallel loopback plug
Rec = the byte value returned from the parallel loopback plug
Att = Read Attempt 1 or 2 (see above)
RawByte = When a byte is read from the pins on the parallel port the bits are in the wrong order. This is the RawByte. After the bits are put back in their correct order then they should match the Sent byte. This is displayed mainly for our debugging purposes.
I get the error, "No permission to open RAW network socket" with the Network test.
You need to have administrator privileges to run this test. Access to Raw Sockets is granted on a per-transport basis. For the address family AF_INET, only administrators have the access necessary to create Raw Sockets.
I get the error "Failed to play back MIDI via sequencer".
Several causes of this problem over the years have been discovered:
- Lenovo investigated an occurrence of this problem with their ThinkPad laptops in mid-2012 and found that this problem was caused by a memory leak in the Conexant audio device drivers.
- Low memory situations, which can occur where there is a memory leak in an application or device driver.
- Known issues in Windows 10 that affect some systems which may be driver issues. There was a bug fix in version 8.1 build 1010 that fixes one cause of this problem so make sure you are using this version or newer.
We believe most of the MIDI related errors are due to device driver bugs and lack of testing of MIDI features being done by the sound hardware manufacturers. It's also possible there may be some operating system bugs as the API used for accessing the MIDI functionality (BurnInTest uses Windows MCI/MIDIMapper to play back test MIDI files) is becoming obsolete and deprecated.
MIDI is no longer a widely used feature and is generally only used by specialist audio engineers and musicians. If MIDI is not considered an important function for your system, you can edit the BurnInTest error classification file (BITErrorClassification.txt) and downgrade the MIDI related errors from SERIOUS to WARNING or INFORMATION. See “Configuring Error Classifications” in the “Event Log” page of the BurnInTest help.
Assuming that the problem is caused by a memory leak in the audio device driver while playing back just a MIDI file via the built-in Windows MIDI mechanism, we believe the impact of this error should be minor and probably only occur with users of low-end MIDI software over longish periods of heavy usage. In such a case it is likely the MIDI software would fail and need to be restarted. High-end MIDI software in many cases does not use the Windows mechanism to play back MIDI (but uses their own implementation) and would likely be unaffected.
Issues with Intel MIPI Camera.
There is currently a known issue when there is an Intel MIPI camera on a system and both BurnInTest and the Microsoft Windows Store Camera App are launched at the same time.
In some cases, BurnInTest is accessing the camera at the same time as the Microsoft camera app and as this access is exclusive the camera app will not be able to access the camera and will not load correctly. The camera is accessed using the "Microsoft Media Foundation" functions, which the Intel driver also uses, currently these functions do not allow shared access of the camera device.
Allowing BurnInTest to finish loading before launching a camera application should prevent this issue from happening.
I get the error, "2D Graphics, Surface lost: Restoring." with the 2D test.
The most common cause of this error is if a KVM switch is in use or the monitor is turned off / goes to sleep. For the test to run, a monitor must be present on the system.
Reporting
Can I add my company logo and company information to the BurnInTest test certificate report?
Yes. The test certificate is a HTML document (BITCertificateTemplate.html). It is almost completely customizable, such as style, your company logo, company information and the certification statement. The only 'fixed' component of the report is a tag <!--BITCERTIFICATE--> that marks where BurnInTest will insert the results information.
You will need an HTML editor to modify the test certificate for your company. For example:
1. To insert your Company Logo, the first item in the <body> of the HTML file is a <table> containing your company name and logo as a gif file:
<p>Put your company logo here:</p>

                            <img src="./Passmark_logo3.gif">
You should modify the text in the first line to be your Company name, and change the logo gif filename to a file containing your company logo.
2. To change your company information, you should edit the footer in the HTML file:
<div class="footer">
Put your company name here:<br>
Level 5, 63 Foveaux St, Surry Hills, 2010, Sydney, Australia<br>
Phone + 61 2 9690 0444<br>
E-Mail: test@example.com<br>
</div>
Please see the "Preparing a Customer Test Certificate" (index item "Test Certificate") in the BurnInTest 5.0 help file for more information on modifying the test certificate.
Test Automation
Is there any way that BurnInTest can be used in an automated fashion, on a production line?
There are several features built into BurnInTest to help automate system testing. This includes several command line parameters like: "/r" - run BurnInTest tests automatically, "/m" - display the machine ID data entry window on BurnInTest startup, "/c" - load a user defined configuration file on BurnInTest startup, "/s" - run a user defined test script on BurnInTest startup.See our white paper on this subject and BurnInTest help.
How can I setup BurnInTest to run from a USB drive under Windows?
See the page BurnInTest FAQ - How can I setup BurnInTest to run from a USB drive under Windows?
I am not using the 3D test and do not want to install or update DirectX. Can I skip the DirectX warning message on startup?
Yes. Start BurnInTest with the "/x" command line parameter (see BurnInTest help for more details).
How can I set BurnInTest to auto start at logon?
As BurnInTest requires elevated administrator permissions it cannot be auto launched by placing it in the startup folder as windows blocks execution of shortcuts like that that require a UAC prompt for the elevated permissions.
Instead, a scheduled task needs to be created, open the Windows Task Scheduler, and create a new task. When creating the task be sure to check the "Run with highest privileges" option on the general tab, choose the trigger for launching BurnInTest (e.g., at log on) and then add an action of "start a program" pointing to the location of bit.exe.